Ukrainian Vyshyvanka Patterns
This post is a translation of the introduction and chapter 1 of Lidya Bebeshko’s informative book on Ukrainian vyshyvanki (traditional Ukrainian shirts, worn by both men and women) and the embroidered designs used to decorate them. The second part of the book consists of a plethora of charted designs for men’s and women’s vyshyvanka embroidery from various regions of Ukraine. I got this book from my sister for Christmas 2024, but as it was in Ukrainian, it took me a while to bite the bullet and dig into it. After taking a course at the Royal School of Needlework in London on Ukrainian whitework in 2025, I was inspired to go back and start trying to parse my way through the Ukrainian with help from online tools and my knowledge of Russian, which was only somewhat helpful. I hope you find Ms. Bebeshko’s insights as useful as I did.
The book in question can easily be found online for sale on many sites. I highly recommend it for its embroidery pattern diagrams. Google search link.
A translation of the introduction and chapter 1 of Лідія Бебешко. Українська вишиванка: Мальовничі узори, мотиви, схемі крою. Харків: КСД, 2024. С. 2-15. / Lidiya Bebeshko. Ukrayins”ka vyshyvanka: Mal”ovnychi uzory, motyvy, sxemi kroyu. Kharkiv: KSD, 2024. S. 2-15 / Lidia Bebeshko. The Ukrainian Vyshyvanka: Decorative Patterns, Motifs, Cutting Diagrams. Kharkiv, KSD, 2024. pp. 2-15.
[Translation by John Beebe, known in the Society for Creative Anachronism as Boyarin Ivan Matfeevich Rezansky, OL.]
[Translator’s notes: I’ve done my best to convey both the meaning and style from the original. Comments in square brackets and footnotes labeled “jeb” are my own. This document may contain specialized vocabulary related to embroidery, archeology, Eastern Orthodoxy, or Slavic history; see this vocabulary list for assistance with some of these terms. This translation was done for my own personal education and future reference, and is provided here as a resource for members of the Society for Creative Anachronism who may be interested in this topic but are unable to read Ukrainian. I receive no compensation or income for this work. If you like this translation, please take a look at other translations I have made available on my blog.]
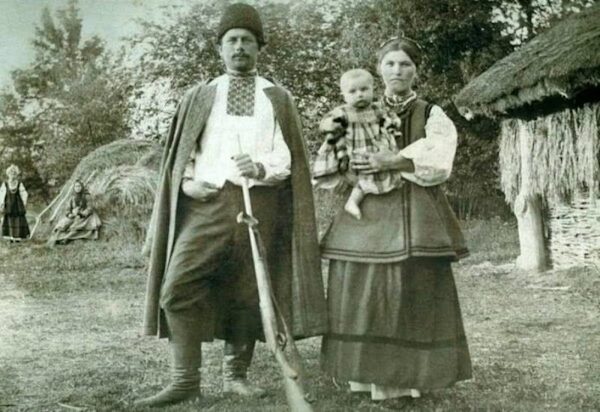
[The featured image is a historical photo of a Ukrainian couple wearing traditional clothing, including the man’s embroidered vyshyvanka. This photo was taken in the Chernihiv region in 1916. I found this photo on this website. The photos below are taken by me from my personal copy of Ms. Bebeshko’s excellent book.]
From the Author
A beautiful and elegant vyshyvanka, decorated with symbolic ornamentation, our native embroidery, has today become not just an element of clothing, but a kind of international calling card of the Ukrainian people. With the passage of time and fashion, it has become an element of traditional Ukrainian culture. Ideally, such a shirt should be sewn according to traditional patterns and decorated with traditional embroidery. However, at all times, embroiderers have tactfully, gradually, and harmoniously modernized this traditional item of clothing according to the requirements of time and lifestyle, making delicate constructive changes to both the cut and embroidered compositions. Embroiderers have created unique original artifacts, but have done so in the vein of centuries-old Ukrainian embroidery traditions. Remember this and join the inexhaustible treasury of Ukrainian embroidered art.
This book is for those who know how to embroider, who are in love with Ukrainian embroidery, who respect traditions, want to continue and develop them, and want to make their own contribution to the treasury of folk embroidery art. It contains layouts of embroidery compositions for men’s and women’s shirts, developed based on samples in old collections, as well as patterns for several traditional and modern methods for sewing them.
The shirt patterns presented in this book are designed to be embroidered using a simple cross stitch, with some using additional counted stitches (smaller cross stitch and stem stitch) as finishing. All patterns are presented with detailed, sized up patterns and descriptions of the ornamentation. The compositions are designed mainly for medium-sized figures, assuming that they will be embroidered, like authentic shirts, with a 2×2 cross stitch on plain weave fabric, with a density of about 10 threads per centimeter. The exception is shirts from the Polesie region, which were usually embroidered with a 3×3 thread cross and, accordingly, the compositions were designed taking this into account. However, you can independently adopt the size of cross stitch taking into account the density of the selected shirt fabric, the size of the details of the individual pattern, the type of selected composition, etc. Our recommendation is to use a 14 count Aida cloth, but other fabrics with a similar thread count per inch (14) or per 10 cm (55) will also work.
On traditional women’s shirts, embroidery was placed on the sleeves, in some regions also on the bust, around the placket and neckline, sewn-on collars and cuffs, and sewn-on chest panels. Sleeve embroidery requires special care, as it is the largest in size and will especially attract attention. Rather than directly embroidering the shirt, it is advisable to sew the main decorations on swatches of the selected fabric in order to test them against the fabric and thread count and to make the necessary calculations. This is necessary to determiine the number of design repeats that canbe placed on the shoulder area of a solid-cut sleeve or on an insert, and the method of their placement relative to the side cuts of the pieces. It is best to embroider the shoulder composition bottom-up from the central vertical of the fabric, placing the ornament facing the side cuts. This way, both edges of the embroidery will be completed symmetrically. You can also choose another option: start embroidering from the front vertical cut, then the back shape will adjust itself. On the second sleeve, both static and dynamic (one-directional) elements should be embroidered mirror-image relative to the first sleeve.
The large shoulder area of a mirror-image sleeve composition is embroidered from top to bottom, from the central vertical to the side seams. It is best to start embroidering a composition with horizontal and diagonal designs from the upper front vertical edge and to move according to the back cut or downwards diagonally. The length and width of the sleeve embroidery may vary depending on the region, size, and shape of the chosen pattern and your own preferences. This book generally presents compositions with sleeves embroidered along their entire length. There are no general guidelines regarding the width of sleeve embroidery. Typically, sleeve embroidery in some regions of Western Polesie and Western Ukraine was not wide (about 20-25 cm); in central and some western regions of Ukraine, it was quite wide (up to 50 cm). For practical reasons, it is worth sewing about half the width of the sleeve. For aesthetic reasons, you can increase the width of the sleeve embroidery to the visible limits, around 2/3 the width of the sleeve.
It should be noted that a feature of traditional women’s shirts from some regions of Ukraine (Luhansk, Vinnitsa, and Odessa regions) was the displacement of the shoulder embroidery from the central vertical of the sleeve towards the back so that it could be seen from behind. On the bust, the embroidery could also be asymmetrical. For example, one vertical ornamental line was embroidered on one side of the opening, and two on the other. Embroidery on other parts of a woman’s shirt should be placed symmetrically relative to the central axis of the part to which it is applied – the collar, cuffs, shirt sleeves, plackets, etc.
On men’s shirts, embroidery was used to decorate around the placket, at the end of sleeves or sewn-in cuffs, as well as sewn-on collars of various heights, lapels, and cuts. According to the tradition of some regions, the shoulders of men’s shirts were also embroidered, in the vertical areas of the side gussets and back, near the shoulder seams. There are no general guidelines for the width and length of the chest embroidery. It would depend on taste, the size of the chosen design, the size of the pattern, etc. Around the placket, the design was embroidered on both sides in a mirror image fashion. It is advisable to embroider this area from the top, moving from the neckline downwards. It is worth placing the center of large ornamental designs near the top, such that they “outline” the neckline. The design should repeat downwards at least 3 times, ending in either a half or full design. Since the placket is not the only area to attract attention, it is necessary to pay attention to the perfect design of the collar as well. Low standup collars on which, based on preliminary calculations, the full number of small ornamental repeats can be placed are not particularly challenging. Medium or larger stand up collars, as well as turn down collars, are recommended to be embroidered as follows. Start embroidering from the opening in the front, using full motifs, and move toward the center of the collar in the middle back of the neck, such that the half designs from either side join in the back. According to the second method, start embroidering from the center of the collar in the back, and move toward the front where the two complete designs should meet at the neckline. This option requires exact calculating such that the front edges of the collar, especially for turn-down collars, end with either a full ornamental motif or with a large, beautiful fragment thereof.
Experienced craftsmen recommend making an embroidered shirt in the following sequence. First, a paper template of the shirt design is developed in accordance with the selected composition, regional traditions, and individual tastes. After adjustment (possibly including sewing a “draft” version of the shirt), the details of the paper template are drawn out on the fabric using a pencil or fabric markers, with sufficient margin between them for further adjustment. These outlined pieces are cut out and roughly assembled. On each piece, the central vertical lines of the main axis for the mirror symmetry are drawn out using a colored thread in a running stitch. After sewing the samples and making the appropriate calculations, you can begin embroidering the shirt details. Once the embroidery has been completed, the final cutting is performed and the pieces are reassembled and sewn together. If necessary, the pieces should be washed and ironed prior to assembly. The finished shirt can be complemented with drawstrings woven from threads, ribbons at the neckline and wrist, buttons, or other fasteners.
I wish you a happy, joyful and inspired creation!
Part 1: Vyshyvanka Patterns
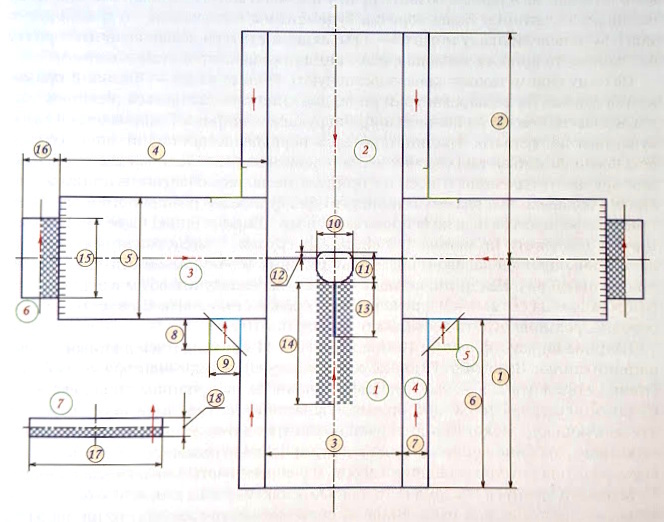
In the cutting diagrams, the outlines of the pattern pieces are shown with dark blue lines. The central axis lines and the center-fold lines of the fabric are indicated with black dashed lines. Red arrows show the direction of the fabric’s warp threads. Segments of different colors, paired identically, mark the areas of the bodice pieces that are to be sewn together. In the general recommendations for traditional cuts and in the shirt cutting diagrams for specific sizes, the measurements are given in centimeters without seam allowances, which should be determined individually for each type of cut.
Men’s Vyshyvanki
The first diagram of a traditional cut for a men’s shirt, cut on the fold, is shown in the illustration below (Figure 1). This universal cut, featuring a center opening (placket), is the most widespread. An authentic version of this type of shirt, without a collar or cuffs and sometimes without side gussets, is known as a “chumak shirt” or simply a “chumak.”
In the illustration, short dashed marks indicate gathering points, where the lower edges of the sleeves are gathered to match the length of the cuff.
Recommendations for drafting the pattern based on individual measurements
The main body piece (torso) may be cut as one continuous piece or composed of two separate pieces—the front and back—joined with straight shoulder seams. The length of the front (1) corresponds to the length of the back (2) (on the diagrams, these measurements are marked with numbers in larger circles) and is determined by measuring from the highest shoulder point at the base of the neck downward to the desired shirt length. The length of the shirt depends primarily on its intended method of wear. If the shirt is to be tucked in, it should be made longer, extending to the upper hip level. If the shirt is to be worn untucked, it may be made shorter. In some regions, men wore fairly short shirts that sometimes reached only to the waistline. The width of the torso (front and back), measurement (3), is generally taken as one half of the chest circumference, though it may also be taken as equal to the shoulder width.
Sleeve length (4) corresponds to the distance from the highest shoulder point to the wrist. This measurement is taken with the arm slightly bent, with the measuring tape passing over the back of the elbow. If desired, this length may be shortened or lengthened. This value may also be calculated using an alternative method: measure the arm length from the upper side point at the base of the neck to the wrist, then subtract the shoulder width that will be formed on the front piece after drafting the neckline opening. Sleeve width (5) is taken as the upper-arm circumference, with the addition of ease allowance. If the shirt is sewn with underarm gussets, this ease may be minimal, approximately 4–5 cm. If the wearer’s build allows the shirt to be made without gussets, the ease allowance for the sleeves should be increased.
The three-dimensional volume of this cut is created by side inserts—four rectangular side gussets (4). Their dimensions vary. The length (6) is determined by the difference between the front length and one half of the sleeve width, while the width (7) is determined as follows. Traditional cuts allow for a generous amount of ease, since such shirts are pulled on over the head and do not have a full front opening. Therefore, for ease of dressing and comfort in wear, the ease allowance is significantly greater than that used in modern open-front garments. This additional ease is formed primarily by the side gussets. The combined width of one pair of side gussets should be no less than one third of the chest circumference. Additional modeling for increased volume is carried out based on the wearer’s individual body characteristics (including body breadth in profile). Square inserts (underarm gussets) provide volume in the shoulder and underarm area. Their dimensions (marked 8–9 on the diagram) for men’s shirts typically range from 8 to 16 cm. For average sizes, 10 × 10 cm gussets are sufficient.
The width of the neckline opening (10) and its depth (11) are taken as one third of the torso width. The offset (12) of the highest point of the neckline from the center horizontal line toward the back is 2.5–3 cm. The depth of the front opening / slit (13) is generally equal to the measurement from the lower front point of the neck (the jugular notch) to the midpoint of the chest height. However, depending on personal preference and individual requirements, this depth may be reduced or increased. The length of the embroidery (14) on the chest around the front opening is selected individually. For an average build, a length of approximately 40 cm is recommended.
Cuffs are cut to length (15) equal to the fist circumference, with an added ease allowance of 2–3 cm to allow the hand to pass through. If the cuffs include a closure, this length corresponds to the wrist circumference, with the addition of ease and the allowance for the button and buttonhole overlap, which together amount to approximately 5–6 cm. The cuff width (16) is generally taken as twice the height of the embroidery, plus 2–3 cm for the fold, depending on the method of additional decoration, such as scalloping, stem-stitch fixation [jeb: top stitching by hand], or similar finishes. The collar length (17) is taken as the neck circumference at the base, with an added ease allowance of 2–3 cm. The collar height (18) equals twice the height of the embroidery, taking into account the height of any additional decoration along the upper fold, such as piping, scalloping, edging, or drawn-thread work.
The traditional cut shown in the diagram is optimal for hand assembly of the pieces using the hemstitching (drawn-thread joining) method. For finishing and hemming, seam allowances of approximately 1.5 cm are added to all cut edges, while the hem allowance at the bottom is 3–5 cm.
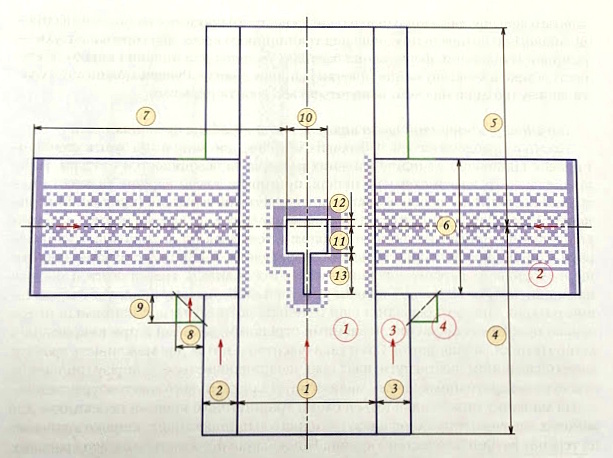
This cut is best suited for standard body types in small and medium sizes. For larger sizes and for body types with non-standard proportions, it is usually drafted individually. A diagram showing the pattern elements that can be modeled is provided in the following illustration (Figure 2). If the center opening (placket) is not simply edge-finished but is instead constructed with a turned-under facing, an additional allowance must be added along the center vertical line of the front body piece (front panel). This allowance should be 7–10 cm, depending on the chosen construction method. In the diagram, half of this allowance is marked as measurement (1) in a circle. The central portion of this allowance is cut down to depth (3), which is equal to the depth of the placket opening. In the diagram, measurement (2) equals one half of measurement (1). The edges of the opening are finished, turned under, and hemmed (the area of the front panel shaded blue). Below the placket, the vertical fabric folds are joined using hemstitching (shown as a red zigzag) to the required width, forming a closed box pleat in the area shaded yellow. This construction method also provides additional shaping and ease in the abdominal area, created by the unsewn portions of the pleat, which contribute extra volume where needed.

On the back panel, additional volume is created by a central allowance with a total width of 8–15 cm (shown on the diagram as a half measurement (4)). On average, an expansion of 10–12 cm is sufficient. This allowance is either gathered into the back neckline, or formed into a central box pleat (the area shaded yellow) and joined by hemstitching to a height of measurement (6), equal to 10–12 cm (shown by red zigzag lines). This construction technique adds extra fullness in the shoulder area of the back, which is necessary for athletic body types.
As desired or necessary, the traditional torso pattern could be flared or tapered from the armhole area downward.
Flare was achieved by using side gussets: measurement (6) was taken as 2.5–3 cm. Gussets were widened on one side only—the side sewn to the torso pieces (the front or back) [jeb: i.e., not along the center seam]. The front and back panels themselves were not altered, retaining their straight vertical edges. Tapering was achieved by reducing the lower width of the front and back panels by 2.5–3 cm (measurements 7 and 8), while the side gussets remained rectangular.
For those who wish to embroider a men’s shirt based on a modern pattern—with slanted shoulder seams and contoured armscyes and sleeve caps—a cutting diagram for a medium size is provided below (Figure 3). Note: the front and back panels are shown folded in half along the vertical grain of the fabric; accordingly, the width measurements indicated apply to one half of each piece.

Seam allowances are determined by the method used to assemble the shirt. If a standard seam is used, 1–1.5 cm should be added to all cut edges, with a hem allowance of 2.5–3 cm at the bottom. If the pattern pieces are to be joined using a felled seam, the recommended allowances for each edge should be adjusted individually, either increased or reduced as required for that method. The yellow areas [jeb: sic, the diagram seems to have omitted the yellow coloring] indicate the center-front and center-back allowances on the front and back panels, analogous to those described above for the traditional cut. These allowances are used for finishing the placket with a turned-under facing, for forming box pleats to add garment volume, and for defining the limits of tapering the front and back panels toward the hem. The sleeves may be tapered toward the cuff (measurements are shown on the diagram) or left straight, as desired.
General recommendations for using similar modern patterns
The diagrams were developed using professional pattern-making methods, but they require refinement and adjustment to match individual measurements and body characteristics. It is best to draft the pattern on paper, make a test fitting, and then introduce the necessary corrections. Particular attention should be paid to the shaped (curved) areas. When drafting the recessed points (deviations from the base straight lines, shown in green), it is advisable to make them 0.5 cm smaller, and to increase the projecting points accordingly. This allows them to be fine-tuned during fitting. After adjustments, it is recommended to sew a mock-up using inexpensive fabric, correct it during fitting, and transfer the resulting changes to the pattern. Only then should the final cutting be carried out. When cutting the fabric, it is essential to strictly follow the grainline directions indicated by the red arrows, including when cutting the collar (both stand and turn-down collar). This grain orientation allows the collar to remain flexible—with the long edges that are sewn into the neckline able to stretch slightly, while the fold line is stabilized by decorative stitches—and helps prevent the collar from standing away from the neck.
Women’s Vyshyvanki
The illustration below (Figure 4) shows a traditional “cut on the fold” pattern for women’s shirts (the “Khlopianka” type)—one of the simplest and most widely used styles in the western regions of Ukraine. Many beautiful, richly colored vyshyvanka embroidery compositions are created for this cut, which numerous girls and women choose to use to decorate their shirts. This cut is typically made without a collar or cuffs. The neckline and chest opening (placket) are finished either with applied facing pieces or without facings, while the edges of the cutouts and hems are densely finished with buttonhole stitch. The finish is often enhanced with additional decorative rows around the perimeter of the neckline, such as herringbone stitch, braid stitch, corded stitching, chain stitch, and similar techniques.
This cut is quite loose, with a generous ease allowance. The volume of the shirt torso is created by inserting side gussets, as well as underarm/shoulder gussets. It is best suited for women of small and medium sizes with a standard body shape.
To develop the pattern draft, the following guidelines should be followed. The width of the shirt body (1) may be taken as one half of the chest circumference, or as the shoulder width, or as the front chest width. Each of these options produces a different shirt model and is selected individually, taking into account body characteristics, the size and shape of the embroidery intended for the upper sleeve and adjacent body area, and personal preference. According to the first method, the body will be the widest, and the side vertical seam will shift away from the center toward the sleeve, resulting in a dropped sleeve effect. With the second method, the vertical seam runs through the midpoint of the shoulder. With the third method, the seam shifts toward the center, producing a raised sleeve effect. The combined width of one pair of side gussets (2 + 3) should equal one half of the ease allowance and together amount to no less than one third of the chest circumference. Thus, for average sizes, the width of one gusset should be at least 8 cm. The length of the front panel (4) and the back panel (5) is the same and is determined by measuring from the highest shoulder point at the base of the neck to the desired shirt length. Traditionally, such shirts were made rather short, extending no more than 10–15 cm below the waist.
The sleeve width (6) is determined by the upper-arm circumference at the shoulder, with an added ease allowance of 5–8 cm. The sleeve length (7) is calculated as the difference between the shoulder-to-wrist measurement (taken from the base of the neck to the wrist) and the shoulder length obtained after drafting the neckline opening. This latter measurement is typically taken as one third of the front panel width. With a sufficiently loose cut, underarm gussets may be omitted. If gussets are used, their dimensions (8, 9) should be selected according to individual chest shape and arm/shoulder structure. In women’s shirts of average size, gussets are typically small, ranging from 6 × 6 cm to 10 × 10 cm. The neck opening is quadrilateral in shape, with the width (10) equal to its total height (11 + 12), which corresponds to one third of the torso width. If desired, the corners may be rounded. The offset (12) of the upper edge of the neckline from the central horizontal line toward the back is taken as 2–2.5 cm. If required or preferred, the neckline may instead be rectangular, with a slight extension in width or height. The depth of the placket (13) is selected individually and is usually 13–14 cm.
Seam allowances for all seams are 1–1.5 cm. The hem allowances at the bottom of the shirt body, side gussets, and sleeves should be increased to 5 cm to allow for final length adjustment after assembly.
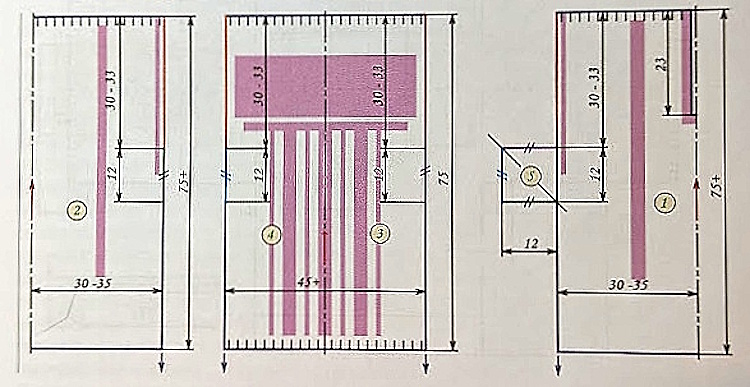
The illustration below (Figure 5) presents a diagram of the traditional “insert-less” shirt style, with integral sleeves sewn to the front and back body pieces along the fabric grain. Its advantages are simplicity and versatility, regardless of body type or size, as well as the large continuous sleeve area (ranging from 45 to 70 cm), which allows for the embroidery of large, bold ornamental patterns and compositions. [jeb: By “insert-less”, they are comparing to the style shown in Figure 7 below, which has rectangular shoulder inserts called a polik or poliki (pl.). The type shown in Figure 5 does not have these inserts.]
A minor drawback of this type of cut is the large width of fabric at the top, which requires careful gathering and fairly strong draw-in to match the size of the neckline opening. However, this cut allows for the creation of a beautiful décolleté shirt without a collar. The wide upper edge can be densely finished with tall looped overedge stitches (preferably with the main fabric turned under, or with a turned-under applied facing), embellished with additional decorative stitches, and fitted with loops made over or under the overcasting, through which a decorative ribbon or a braided multicolored cord may be threaded. Using such a cord makes it possible to adjust the shape of the shirt—the relative positioning of its parts directly on the body—as well as the volume of the neckline around the neck during dressing and wear. A traditional cut with this method of neckline finishing is also optimal from a garment-care perspective, both for washing and ironing. It is sufficient to remove the cord, after which all parts of the shirt can be laid flat easily, without folds, gathers, wrinkling, creasing, etc.
Note: the front panel and back panel are shown folded in half along the vertical axis, therefore the dimensions indicated represent half of their total width. Short parallel marks indicate the edges of the pattern pieces that are to be gathered.
The measurements shown in the diagram are intended for figures of average build. The recommended seam allowance is 1–2 cm, depending on the construction method (hand or machine sewing) and the type of seams used to join the pattern pieces. Shirts of this type were traditionally made quite loose, with a total garment circumference ranging from 120 to 150 cm. A modern version of such a shirt may be considerably narrower, especially for small and medium sizes. The length of the seams between the front panel and sleeve and between the back panel and sleeve (shown on the diagram as 30–33 cm) is determined by the measurement from the upper side point at the base of the neck to the midpoint of the underarm for shirts whose upper edge is gathered toward the neck. For a décolleté version, these seams are 3–5 cm shorter. In such shirts, rather large underarm gussets were sewn in to ensure freedom of movement, sometimes extending as far as the waist. However, there are no strict rules regarding whether to use these elements or what their exact dimensions should be. The choice of construction (with or without gussets) is individual and depends on personal preference, body characteristics, overall shirt width, and similar factors.
The illustration below (Figure 6) shows a diagram of a traditional women’s shirt cut of the set-in type, with shoulder inserts [jeb: called a polik or poliki (pl.) in Ukrainian, a rectangular shoulder insert] sewn in along the weft direction between the front and back panels. This type of cut was widespread throughout virtually all regions of Ukraine. Its main advantage is a relatively narrow, closed neckline, which is formed after joining the main pattern pieces and requires gathering. This cut was commonly complemented with standing collars or turn-down collars, and the neckline was often finished with a rolled edge. It may also be finished using the method described above for insert-less shirt cuts. In the diagram, short parallel marks indicate the areas to be gathered, where the pattern pieces are drawn in. The neckline is gathered to match the collar length, and the lower edges of the sleeves are gathered to match the cuff dimensions.
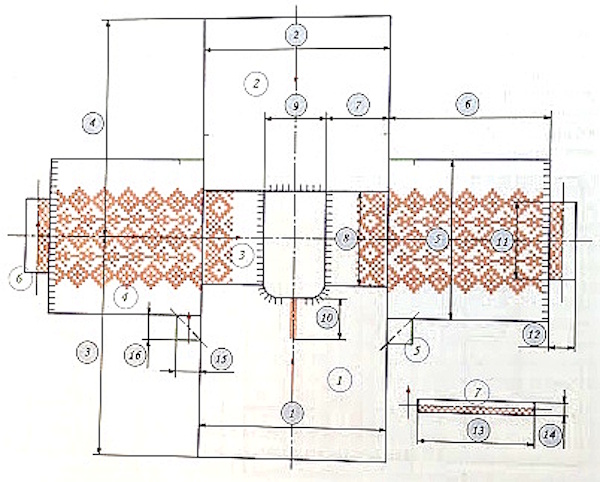
Shirts of this type of cut, like those described above, had fairly spacious silhouettes—that is, they were wide and practically “one-size” garments. A modern version of such a shirt may be slightly narrower, but still loose enough to be pulled on over the head and worn comfortably. The recommended dimensions of the traditional pattern pieces for a figure with average proportions are as follows: the width of the front panel (1) equals the width of the back panel (2) and is taken as 60–65 cm; the length of the front panel (3) and the back panel (4) depends on the type of shirt (full-length, long, or shortened “to the waist”) as well as personal preference and body characteristics. As a standard, this measurement is 130 cm for full-length shirts and 70 cm for short shirts.
The sleeve width (5) may vary within the range of 45–75 cm, depending on the scale of the embroidered composition intended for the sleeve, the overall size of the garment, and personal preference. In central Ukraine, particularly in some areas of the Zhytomyr, Kyiv, and Chernihiv Polissia regions, the sleeves of such shirts were very wide, 70 cm or more. In Western Polissia and certain other regions of Ukraine, they were considerably narrower, approximately 40–50 cm. The sleeve length (6) for the standard version (to the wrist, with a cuff) is taken as 50 cm. This measurement is adjusted according to individual measurements, depending on the desired sleeve length (full-length or shortened to three-quarter length), the height of the cuff, and related factors.
Shoulder inserts (poliks) in different regions of Ukraine had varying heights (7) and widths (8). The smallest were used in Western Polissia and in the Kharkiv region, with widths of approximately 20 cm and heights of 18–23 cm, while the largest—up to 35 cm—were found in the western regions of Ukraine. In the central regions of Ukraine, these dimensions varied, but the height and width of the insert were generally proportionate. Traditionally, it is recommended to take the height (7) of the insert as 25–28 cm and the width (8) as 28–32 cm. The height of the insert may also be estimated using the following method: divide the width of the front/back panel (1) by three. In addition to technological considerations—such as pattern proportions, individual measurements, and the desired shape and volume of the shirt—it is also important to take into account the size of the ornamental compositions intended to be embroidered on this most visually prominent element of the shirt.
The width of the neckline opening (10) is taken as one third of the width of the front/back panel; it may vary depending on the size of the shoulder insert, either decreasing or increasing accordingly. Its height equals the width of the insert, and at the front the neckline is deepened by 3–3.5 cm. The length (10) of the central slit extending downward from the neckline is usually 10–15 cm and depends on height, female body characteristics, and personal preference. The length (11) of a continuous, uncut cuff equals the fist circumference, with a small ease allowance of 2–3 cm to allow the hand to pass through. If cuffs with a closure are planned, their length should equal the wrist circumference, with additional allowances for the placement of buttons and buttonholes. The height of the straight cuff (its unfolded height is marked as 12 on the diagram) may range from 2 to 12 cm, depending on regional traditions associated with the shirt, personal taste, and the ornamentation chosen for decoration. The length (13) of the low standing collar, shown in the diagram as one possible option, should be no less than the neck circumference at the base, with an added 2–3 cm ease allowance. If the shirt was made slightly décolleté, as was traditional for summer versions in several central and eastern regions of Ukraine, the neckline was gathered to the required size and finished with a rolled edge (rouleau) made from an applied strip. In Eastern Podillia and the Poltava region, the neckline edges of this and other shirt models were often beautifully finished with overedge stitching. Along the entire length of the neckline, neat, even pleats were formed and secured 1.5–2 cm below the upper edge with an applied decorative tape, 1–1.5 cm wide.
The dimensions of the underarm gussets (15 and 16, typically ranging from 6 × 6 cm to 10 × 10 cm) for this type of cut are determined by the sizes of the adjacent pattern pieces. If the shirt body, shoulder inserts, and sleeves are sufficiently wide to provide freedom of movement without gussets, they may be omitted. Seam allowances for all seams are typically taken as 1–2 cm. For the hem allowances at the bottom of the shirt body (front and back), a larger allowance should be provided.
The illustration below (Figure 7) presents a modeled variation of the insert style for a women’s shirt, with sleeves attached along the grain of the front and back panels. This construction makes it possible to eliminate the main drawback of the traditional cut—the shift or pulling of the upper part of the shirt toward the back. The cut is designed for a summer version of the shirt (slightly décolleté), intended for a figure of average height and average measurements (chest circumference 90–100 cm).

It is important to note that the front and back pattern pieces are shown folded in half along the vertical grain of the fabric; accordingly, the dimensions given represent half of their total width. The measurements shown in parentheses next to the upper edges of the front panel, back panel, and shoulder insert indicate the final dimensions to which these pieces should be gathered.
This cut is quite versatile and is suitable for all sizes and body types. The side inserts are continuous: instead of four separate side gussets, two inserts are sewn in, and side seams are absent. Their upper edges are diagonal, so that the angle between the slanted edges is a right angle. This portion of the gusset functions as one half of an underarm gusset. After gathering, the upper edge of the shirt is finished with an applied rolled edge or treated using the method described above: before gathering, the edge is densely overcast, loops are formed along the neckline, and a cord is threaded through them. The only drawback of this cut is that the diagonal fabric edges do not allow finishing with traditional hand hemstitching techniques, such as prutkuvannia [jeb: a traditional Ukrainian drawn-thread hemstitch forming straight decorative bars by bundling remaining warp or weft threads after withdrawal.], tsyrkuvannia [jeb: a traditional Ukrainian ornamental drawn-thread technique creating looped or interlaced decorative patterns along straight fabric edges. See Figure jeb1 below], and similar methods. Finishing these edges therefore requires a certain level of skill.

To draft the pattern pieces of this cut for larger sizes, it is sufficient to increase the width of the front panel, back panel, sleeves, and side gussets by 2 cm for each successive larger size, measured from the central vertical axis of the respective pieces, and to adjust the height and length according to the required measurements. For a “closed” shirt version, with a neckline finished close to the neck, it is necessary to increase the height of the shoulder insert (polik) by 5–7 cm and to adjust the height of the upper sections of the front and back panels accordingly, extending the slanted straight lines upward. In this case, the shirt may be finished with a collar. This type of cut typically uses low cuffs, or the lower edges of the sleeves may be finished using the same method recommended for finishing the neckline.
The illustration below (Figure 8) presents a cutting pattern for a modern women’s shirt-blouse with raglan sleeves, modeled for vyshyvanka embroidery. It is designed for average measurements (chest circumference 92–96 cm) and a “standard” body type. The dimensions of the pattern pieces—including the sleeves—are sufficiently large to accommodate traditional embroidered compositions. Please note that the front and back panels are shown folded in half along the vertical grain of the fabric; accordingly, the dimensions indicated represent half of their total width.

The sleeve width may be increased as needed or desired. The upper neckline (décolleté) is finished using one of the recommended methods described above—by gathering to the required dimensions, with additional decorative edging or draw-in finishing. The lengths of the gathered sections of the front panel, back panel, and sleeves are indicated in the previous diagram, shown in parentheses next to the corresponding measurements. If desired, the proposed cut may be adjusted for larger measurements. The pattern pieces of this cut are assembled using machine stitching; accordingly, the seam allowances may be slightly reduced.