When I started playing in the SCA again recently, I decided to do a goldwork project, and picked my device as the theme. I figured I could present this at an Athena’s Thimble panel as my first submission, it would let me practice Or Nue again, and I’d have a new item to display my heraldry.
Or Nue (French for “shaded gold”) is a technique that was commonly used in period, in particular for ecclesiastical garments. There is a great article here by Jane Zimmerman which gives an introduction to the technique. The gold threads in Or Nue are typically thin strips of gold foil wrapped around a fiber core (what today is referred to as “Japan gold”). The foil is a bit “scaly” in texture, so it doesn’t pass through fabric terribly well. Instead, it was worked by laying the gold across the surface of the fabric and couching it down with silk. For large fields, a brick or similar pattern could be used to give a shade of color, or the couching could be closer together for a more solid color. In the main design, the gold may be so close together that you just get solid blocks of silk color, with the gold just peeking through in spots. The gold is of course very sumptuous looking, and reflects light very well, especially in lower light settings like candle-light, giving the overall work a nice bit of flash.
 |
An example of period Or Nue, detail of Mantle of the the Vestments of the Order of the Golden Fleece
(Kaiserliche Schatzkammer, Vienna) |
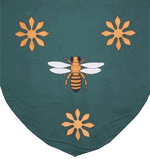
I have had a banner for many years which looks like this. I used this as a starting place, although I decided to change up the style of the flowers and bee, and to work it as a circular badge.
|
| Vert, a bee proper winged between three octofoils Or |
|
| My new slate frame, and just getting started with the goldwork. I was able to work on this quite a bit at Autumn’s Inspirations, and got a lot of positive feedback as I did so. |
So, I started out the project by drawing out the cartoon for the project, then digitizing it so I could play with the size to something that felt right. I’m not the best at drawing, but I eventually came up with a design with which I was pretty happy. I transferred the design to some linen, and blocked it off on my cherry wood slate frame (brand new for this project!). I already had the colors of silk I needed in Au Ver a Soie’s “Soie d’Alger” line (my preferred brand), and I got some amazing No. 9 British Glossy Japan thread from Berlin Embroidery.
I ended up basting a few vertical lines across the work to help with keeping the goldwork parallel throughout the course of the project. The gold was laid and couched down in paired rows. The green field was couched with a rough checkerboard pattern to give it a nice dark tint while also allowing a lot of the gold metal to shine through. As you can see, the first several passes were all fieldwork which went relatively quickly. Once I started hitting sections of the design, I would couch in the appropriate color. This made the stitching slower as I had to coordinate through various colors.
|
| The same pass started both the first star, as well as the edge of the bee’s wing, so I suddenly went from one color (green) to four (green, black, yellow, ecru). |
While I was working with a particular color, I had my other silk color strands pinned off to one side to keep them out of the way. Eventually as the bee got thicker, I ended up actually having two green strands, one for the top of the piece, and one for below the bee, to avoid wasting a lot of silk going back and forth across the length of the bee behind the scenes.
|
| About 1/3 done. |
As I was working the piece, I realized that the linen and the design stretched a bit unevenly when I dressed the frame, so I ended up having to eyeball a few modifications to the design to keep it more or less even and circular. Lesson learned for next time – for stretchier fabrics, dress the frame first, then trace the design.
|
| About halfway done. As you can see, the two sides of the bee are not quite mirror images, so I used the lines as suggestions and started eyeballing to “even up” the two sides. |
I also found that the center of the piece, which was couched much more densely, had a tendency to “bulge” over as a result and the goldwork didn’t lie completely parallel. The guidelines I basted in made it easy to notice this happening, and then I would work in extra passes above or below the bee to fill in the work and bring the background back to parallel. The effect isn’t terribly noticeable. Jane Zimmerman’s article above does mention the possibility of this happening, and suggests leaving very tiny gaps (1/16″ or less) between the passes of gold to leave space for the couching and prevent this from happening. I read her suggestion about halfway through the project, and was happy with the result when I started putting it into practice.
|
| Extreme close up!! |
And, here’s where I currently stand with the project. Unfortunately I lost this game of “embroidery chicken” and ran out of silk before I could finish it, so I’m waiting for more to arrive. I was unable to find the shade I needed here in the Boston area, so I ordered some online from Needle in a Haystack.
|
| Current state of progress. Some of the edge turns are a bit rough, but they’ll be covered up later when I applique this onto a pouch. |


3 Replies to “Or Nue Heraldic Bee, part I”